Code Summary
The Code Summary is the last viewer to be reviewed prior to chart submission. This screen shows a summary of activity on the account and provides activity buttons to Claim Ownership, Show History, and Print Summary (if a printer is configured). This viewer also provides information on Current Owner, First Coder, Last Saver, and Last Submitter. Users can expand the width of the Code Summary viewer by clicking on the arrow in the top right of the viewer.

Show History
The Show History button provides a timeline view of activity on the account along with an audit trail of account activity from point of admission to the current date. It includes a visual timeline and below the timeline there will be an audit trail of account activity.
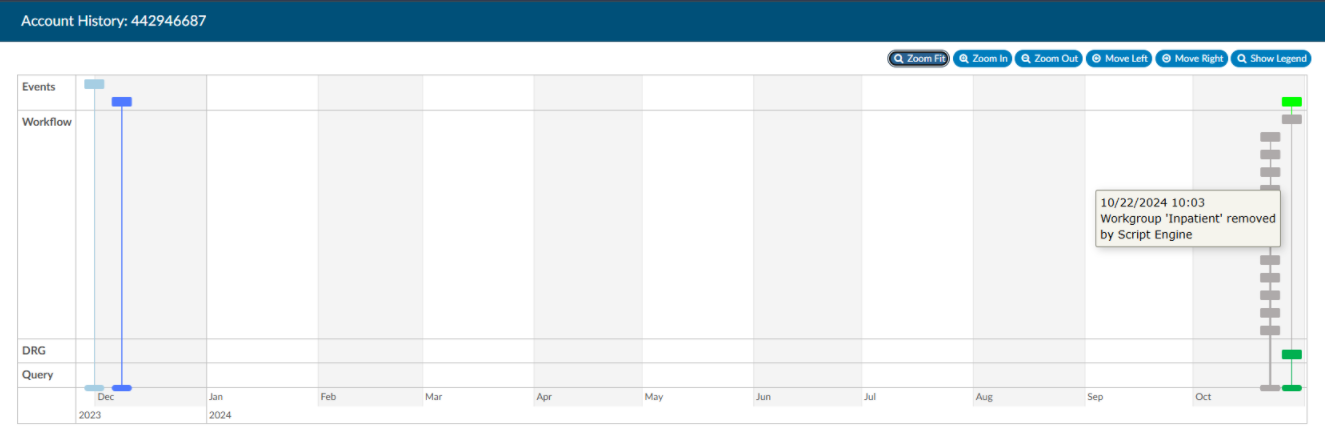
Upon opening Show History, users will see the entire history from a birds-eye view. The user has the option of using the Zoom In and Zoom Out buttons to expand or collapse the timeline. The Zoom Fit will bring the visual timeline back to its original collapsed grid. Hover over any of the event boxes and the contents will be displayed.
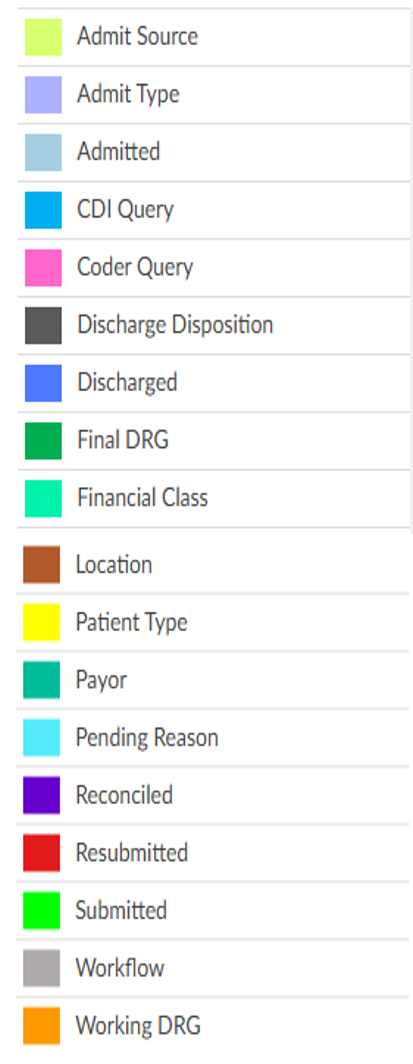
The legend can be found by clicking Show Legend to let the user know what the colors represent without having to hover over them. When clicked, it will open the Legend and the button name will change to “Hide Legend”. Click again to close.
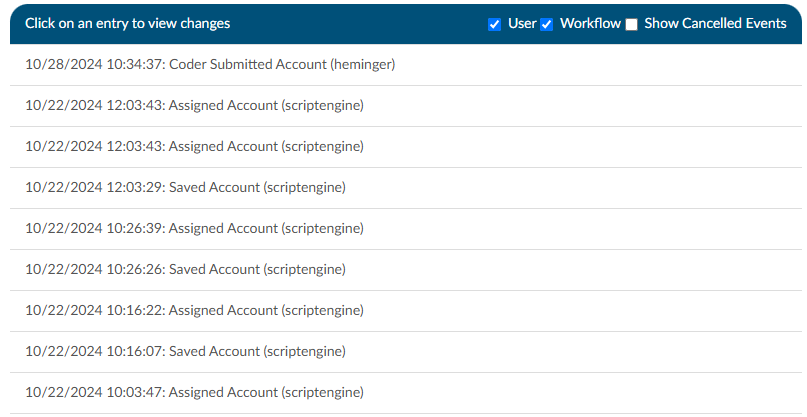
Click on an entry by date to view the changes that were made to the account on the date and time indicated.
Admit Diagnosis
The Admit Diagnosis code and description are displayed below any Validation Results and/or Pending Reasons.

Visit Reasons
Listed beneath Admit Diagnosis are the Visit Reason codes in code sequence order. The list includes the Visit Reason code and description.

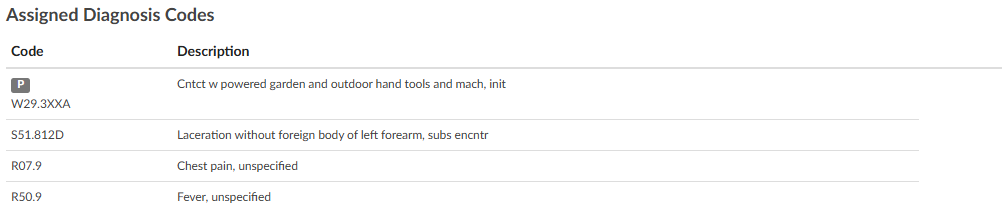
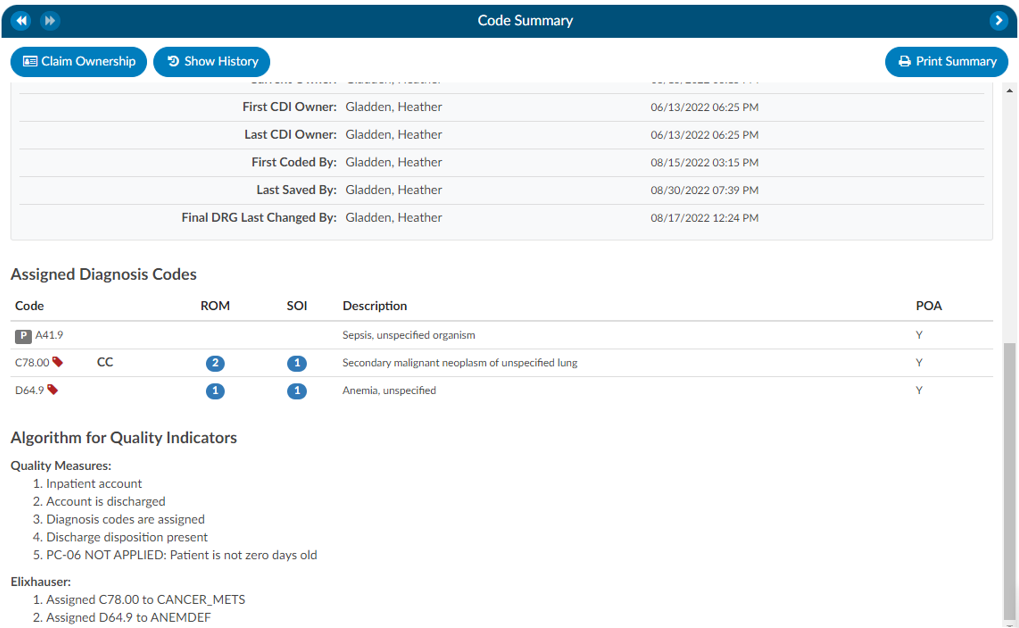
Assigned Diagnosis Codes
The Assigned Diagnosis Codes are listed in code sequence order below Visit Reasons. The listing includes the diagnosis code, description, and POA assignment (Y/N).
Assigned Procedure Codes
Listed beneath Assigned Diagnosis Codes are the Assigned Procedure Codes in code sequence order. The list includes the procedure code, description, Service Date, and Physician.

Assigned CPT Codes
Listed beneath Assigned Procedure Codes are the Assigned CPT Codes in code sequence order. The list includes the CPT code, Modifiers, Code Description, Service Date, Physician, APC and Servier Indicator.

Print Summary
If a printer is configured for the computer, click on this button to print a copy of the abstract for this account.
Claim Ownership
Use the Claim Ownership feature based on the organization’s requirements and procedures. Consult your manager for more information on claiming ownership of a chart.
Final Code Summary
The Final Code Summary will only be available once the facility Coder clicks the Submit button. This provides transparency between CDI and physician coding teams (if also using Fusion CAC) as to what was coded. When a submitted chart is open again, users will see a new viewer under the navigation menu called the Final Code Summary. This will display what the coders coded along with code status details and sequencing. This data is viewable only for the role of ‘CDI’.
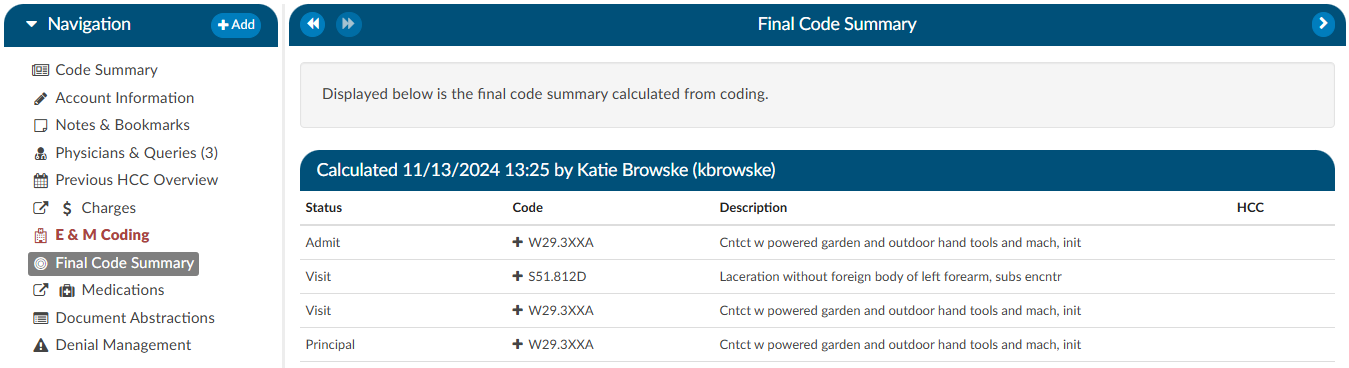
Clicking on the header will expand the selection to display the codes that were coded and DRG/APC, if applicable. Any codes with a plus (+) sign indicates the code has not been added to the account. The plus (+) sign does not indicate that the code needs to be added. It is for the user to quickly add the code if they determine it is needed using coding judgment and supporting documentation. If applicable, the code’s HCC designation will show the HCC number and its version.
Physician Coding Summary
The Physician Code Summary will display if the Physician Coders are also coding within Fusion CAC, and they submit the chart. This provides transparency between the facility and physician coding teams as to what was coded.
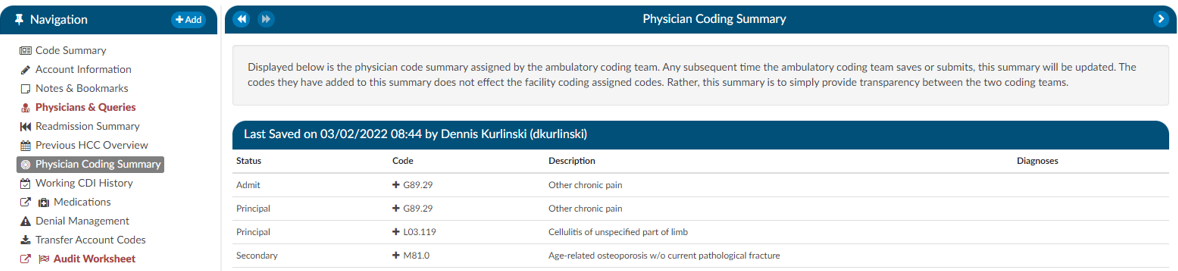
Clicking on the header will expand the selection to display the codes that were coded. Any codes with a plus (+) sign indicates the code has not been added to the account. The plus (+) sign does not indicate that the code needs to be added. It is for the user to quickly add the code if they determine it is needed using coding judgment and supporting documentation.
Subsections of Code Summary
Pending Reasons
Pending Reasons
A list of Pending Reasons assigned to the account can be found within the Code Summary viewer below Validation Results.

Pending reasons are used when a chart cannot be completed or routed to another Workgroup. The number of pending reasons selected is unlimited. Pending reasons will be different for each facility based on system configuration specifications. Please contact your manager for definition and use of available pending reasons.
Pending Reasons can be added to the account by clicking on the drop-down menu and selecting the applicable Pending Reason. If the organization has selected to allow a physician to be tied to a pending reason, the user will be prompted to assign a physician to the pending reason, and will see an additional physician field in the list of pending reasons.
If physicians have been turned on for pending reasons, not all pending reasons may be tied to a physician. This option is set within the mapping configuration.
If a pending reason is added to an account, the Submit button will be grayed out and unavailable. Click on the Save button to save all changes and exit the chart. Charts with pending reasons will stay within the existing Workgroup until the Pending Reason is removed. Pending Reasons can also be deleted/removed from accounts by clicking on the “X” next to the Pending Reason to be removed.
Pending Reason Notes
On any account, an edit button will appear to the left of the pending reason. Clicking that button will drop down a note entry where the user can record a note. Pressing ENTER will record the note. Keep in mind that a note can be deleted by clicking a trash can symbol to its left. In Account Search, the “Pending Reasons” drill down will now include the “Note” field.

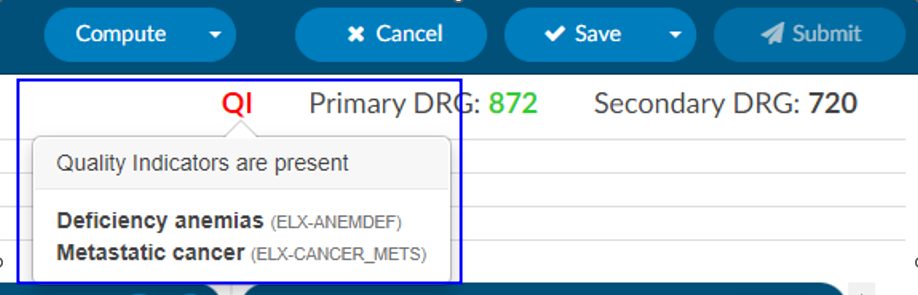
Quality Indicators
In the Code Summary Viewer at the bottom, you’ll find the Algorithm for Quality Indicators, which outlines the methodology used to identify Pediatric Quality Indicators (PDI), Patient Safety Indicators (PSI), Quality Measure PC-06, and Elixhauser Measures.
PSI Indicators
The PSI Module uses the PSI technical specification from Agency for Healthcare Research and Quality
U.S. Department of Health and Human Services from www.qualityindicators.ahrq.gov.

Fusion CAC leverages the codes from the assigned code tree, along with other relevant patient data, to determine whether specific quality measures are met. Fusion CAC provides an indicator on the banner bar when codes coupled with patient demographics meet a PSI guideline.
The PSI is reported in one of two fields CDI PSI Indicator or PSI Indicator. The indicator can be used for workflow and/or reporting. When a PSI is applied to an account it will display in the algorithm section of the Code Summary viewer. A red tag will display next to the applied PSI for visibility.

PDI Indicator
The PDI Module uses the PDI technical specification from Agency for Healthcare Research and Quality
U.S. Department of Health and Human Services www.qualityindicators.ahrq.gov.
The Pediatric Quality Indicators (PDIs) focus on potentially preventable complications and iatrogenic
events for pediatric patients treated in hospitals and on preventable hospitalizations among pediatric
patients, considering the special characteristics of the pediatric population.
This PDI indicator displays in the banner bar under the compute button. The PDI is reported in one of two fields CDI PDI Indicator or PDI Indicator if identified. The indicator can be used for workflow and/or reporting.
The algorithm for the PDI on if it applied or not is within the Code Summary viewer.
If a code that causes an exclusion for a PSI or PDI occurs in the top 25 codes (or custom limit set by the organization) the PSI/PDI will show in the banner, with an asterisk next to it, to indicate the PSI was conditionally applied. The algorithm at the bottom of the Code Summary viewer will show the reason why.
PC-06 Indicator
The Quality Measure Module supports the PC06 measure and uses the Joint Commission technical
specification https://manual.jointcommission.org/releases/TJC2018B/MIF0393.html.

Fusion CAC uses the codes from the assigned code tree along with other patient data that meet each PC-06
guideline. Fusion CAC provides an indicator on the banner bar to a coder when codes coupled with
patient demographics meet a PC-06 guideline. The indicator can be used for workflow and/or reporting.
Elixhauser Comorbidity Measure Indicator
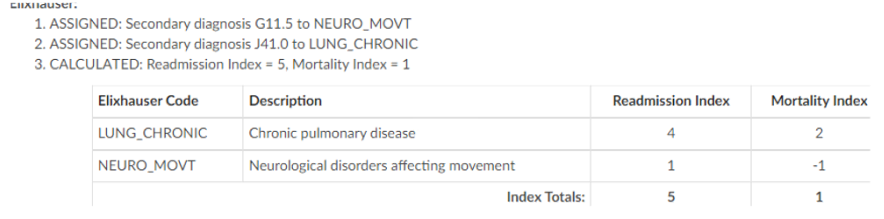
The Elixhauser Comorbidity Index is a method of categorizing comorbidities of patients based on the
International Classification of Diseases (ICD) diagnosis codes. The indicator can be used for workflow
and/or reporting.
The algorithm to determine the Elixhauser measure can be found on the code summary at the bottom under the assigned codes. A table under the Elixhauser section of the Code Summary sheet will appear, showing weight totals for each item that triggers.
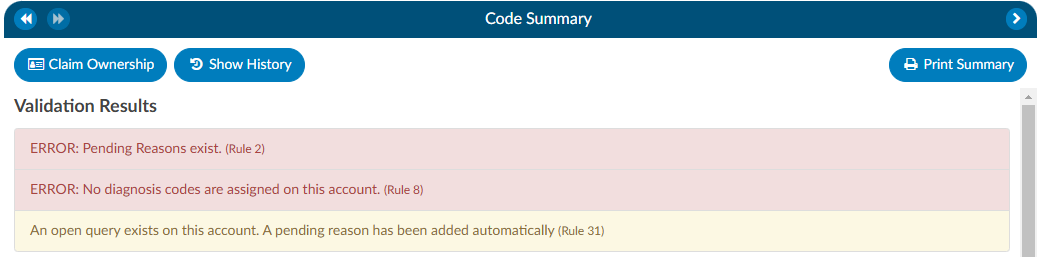
Validation Results
When the Code Summary link displays RED
, there are validation errors on the chart that must be resolved prior to submission.

Any errors preventing submission of the chart will be highlighted in the box under Validation Results on the Code Summary screen. Validation Results within the chart that should be reviewed and validated before the chart is finalized and submitted for billing.
ERROR results will display in RED
. These are hard stops that will prevent the chart from being submitted. The Submit button will be grayed out until errors have been resolved, including pending reasons that have been assigned.
Warning results will display in YELLOW
. These are reminders/suggestions for the user. Warnings do not need to be resolved before submitting the chart.
Once all necessary validations results are resolved, the Code Summary link in the Navigation tree will return to black and users can hit the Submit button to complete the chart.